Reporting User Guide
The Reporting User Guide provides instructions on how to generate custom reports.
This video is also available with audio description.
INTRODUCTION
The Reporting User Guide provides instructions on how to generate pre-defined reports and/or create custom reports on a daily, weekly, and monthly basis as well as within specific date ranges. The types of reports available can assist you with the following:
- Balancing batches and deposits
- Creating daily deposit receipts
- Looking at transaction detail information
- Determining the status of a batch, deposit, or transaction
- Researching previous batches, deposits, and transactions
- Retrieving images of scanned items
- Generating a list of payments received from your customer
PRIVILEGES AND ROLES
The RDC system administrator within your organization will need to assign the (full) Accounting role under the Customer Services privilege for any users that will be working with the reporting functionality.
REPORTS
COMMONALITIES AMONG REPORTS
- The Remote Deposit Capture system is defaulted to reflect Central Time (CT). All reports are generated in Central Time (CT)
-

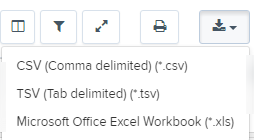
- Exporting is available into a Microsoft® Office Excel® spreadsheet, a tab-delimited file (.tsv) or a comma delimited file (.csv).
-
Select

-
Select

-
Select

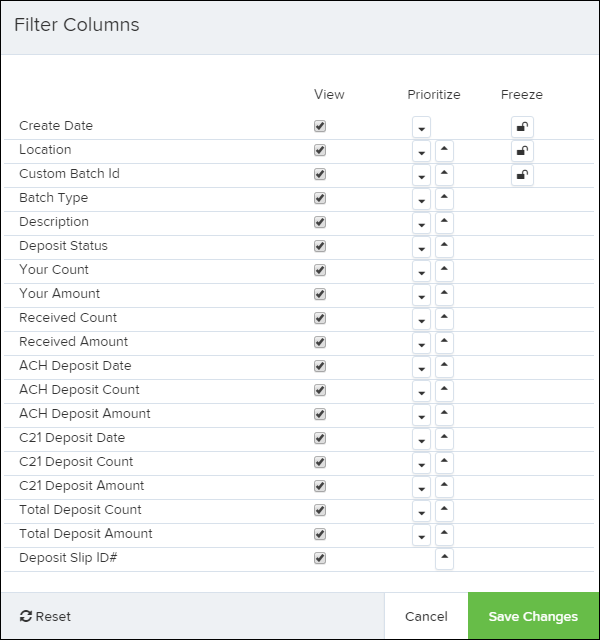
- Use the View option to determine whether an informational column appears.
- Use the Prioritize tools to change the order of a column in the report.
-
Use the Freeze tool to lock a column in place when viewing the report.
NOTE:Report filter settings can be saved into a template for later use. However, it is recommended that you save the reports themselves by exporting them to a file saved on your computer.
CURRENT TRANSACTION SUMMARY
The Current Transaction Summary can be found on the Dashboard upon logging in.
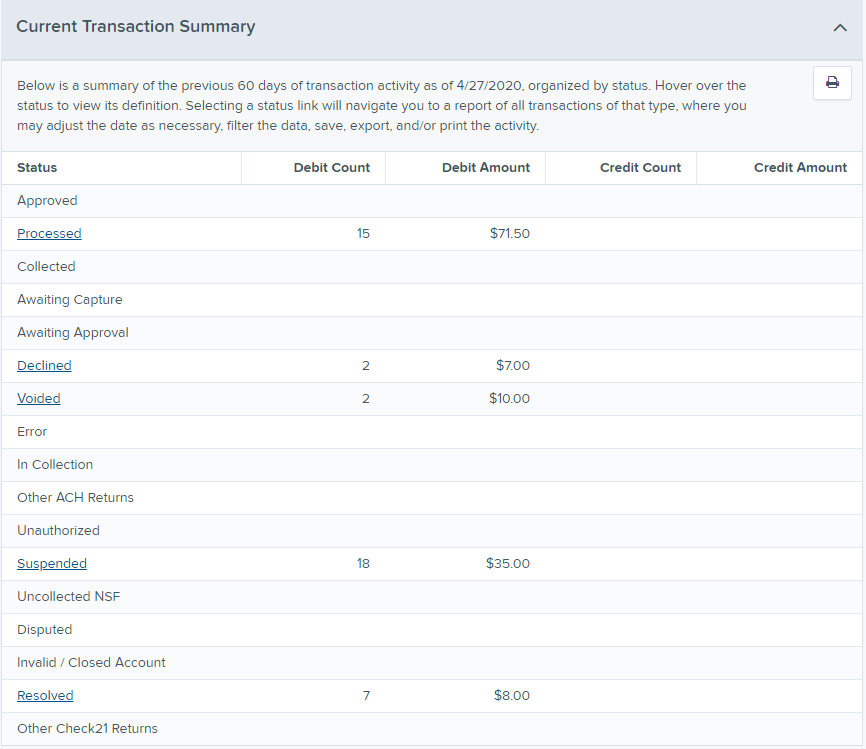
The Current Transaction Dashboard is a numerical display of the total number of items and dollar amounts of all Check 21 items for all locations being processed. It covers a rolling 60-day period and is broken down by a transaction’s current status within the system.
Although there are many reports you can use to view transactions, the Current Transaction Summary allows you to quickly identify any unusual activity regarding your transactions with any of the following status types:
- Declined
- Error
- Voided
- Suspended (requires financial institution’s action to approve or void)
The following table provides a list and definition of all the transaction statuses within the system, for reference.
| Transaction Status | Definition |
|---|---|
| Approved | The transaction has been verified and will be processed at the designated cut-off time. |
| Processed | The transaction has been transmitted to the appropriate network (Check 21). Changes can no longer be made, and the transaction can no longer be voided. |
| Collected | Not Applicable |
| Awaiting Capture | Not Applicable |
| Awaiting Approval | The transaction has been verified, but the amount of the transaction exceeded the Dual Authorization limit of the user who created it. An authorized approver must review and then either approve or void the transaction. |
| Declined | The transaction has been declined by the system and will not be processed. The transaction exceeded either Dual Authorization limits or Velocity limits. |
| Voided | The transaction has been voided and will not be processed. A transaction may not be voided once the item is in the Processed status. |
| Error | An internal error has occurred within the system. Contact the Business Client Service team at 617-441-7051 for assistance. |
| In Collection | Not Applicable |
| Other ACH Returns | Not Applicable |
| Unauthorized | Not Applicable |
| Uncollected NSF | Not Applicable |
| Suspended | The transaction has been verified, but it has exceeded Velocity limits. |
| Disputed | Not Applicable |
| Invalid/Closed Account | Not Applicable |
| Resolved | The transaction has been moved into a Resolved status by a user to indicate that no further action related to the transaction is required. Transactions can be moved into a Resolved status from a status of Declined, Voided, or Error. |
| Other Check21 Returns | The Check21 transaction has been returned by the Federal Reserve. The transaction will be charged back. |
TRANSACTION STATUS REPORT
The Transaction Status report is a pre-defined report listing all transactions in a specific status. It is automatically generated when you select a status link from the Current Transaction Summary Dashboard. The list will contain items that have been processed within the last 60 days (except the Approved status, which shows up to the last 24 hours) and give you access to individual transaction information and images of the scanned items as well. Follow the steps below to generate a Transaction Status report.
-
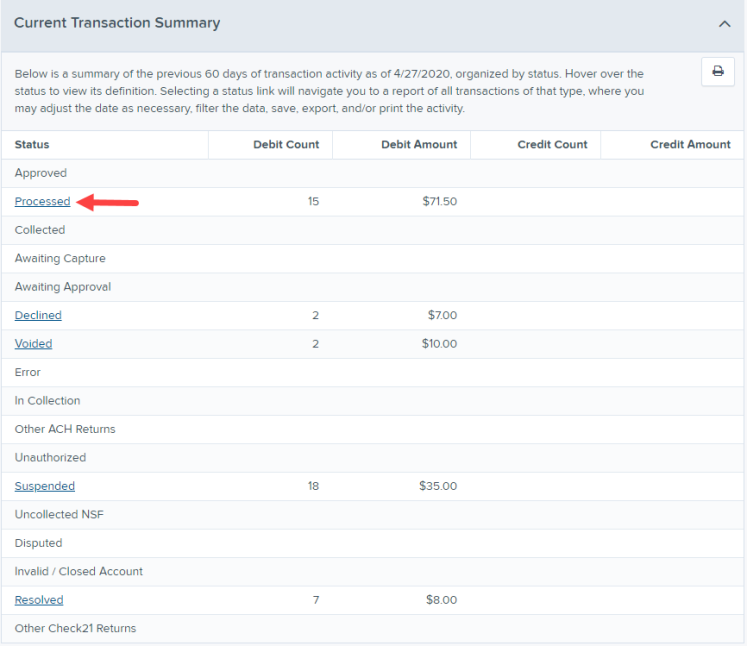
Select a status that appears as a link and contains values in the Current Transaction Summary (for example, Processed in the graphic below).
-
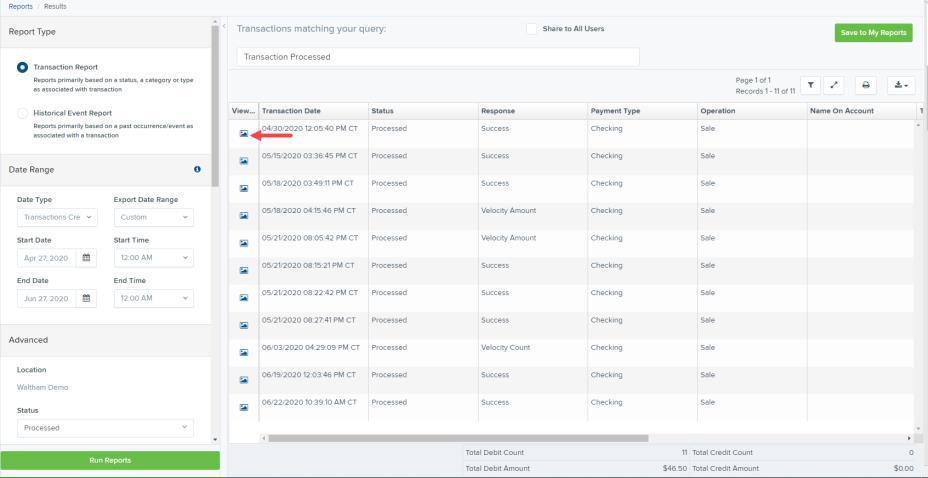
A list of the first 25 transactions (default value) is displayed. Select a View link in the far-left column to view details about that transaction.
-
The Transaction Details page appears for that status. Select Show Events and/or Show Audit History to view more details about the transaction.
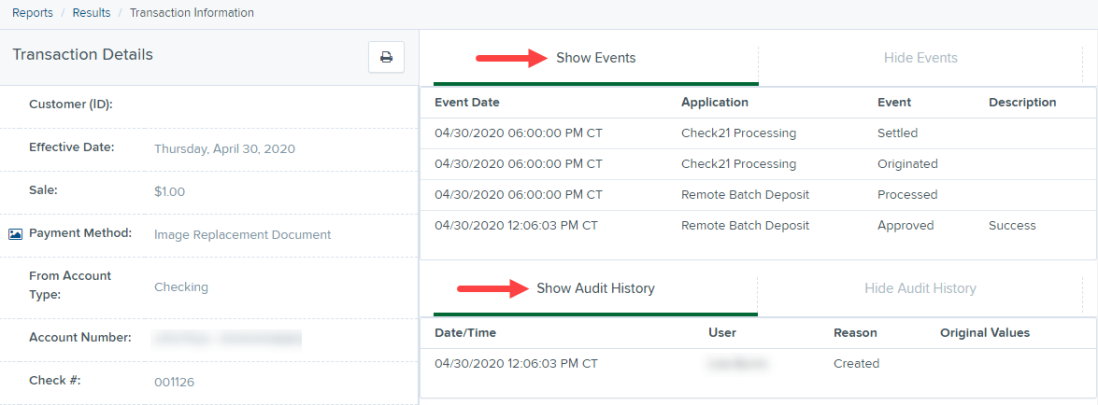
- Show Events: The automated steps/processes a transaction has gone through. The most recent steps are displayed first and include the date/time the events took place in Central Time.
- Show Audit History: Manual interaction with the transaction. Details are displayed with the latest steps first and includes the date/time processes took place in Central Time.
CUSTOMIZED REPORTING - USING THE REPORT BUILDER UTILITY
The report builder utility can be used to create one-time queries and custom recurring daily, weekly, and monthly reports for bookkeeping, historical research, and problem solving.
There are two options when creating a customized report:
- New Report – the report is only available to only you.
- New Shared Report - the shared report is available to other users who have access to the system. Other users will be able to pull the shared report and use it to generate information. Only the user who created the shared report can delete it.
-
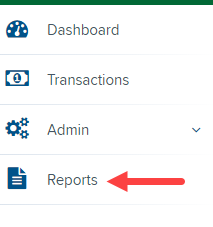
Select Reports from the left main menu.
-
Click New Report or New Shared Report, if it will be available to others.

- The Reports page appears. In the top bar, enter a Title for the report. Fill in the report criteria in each of the four sections: Report Type, Date Range, Advanced, and Report Column headers.
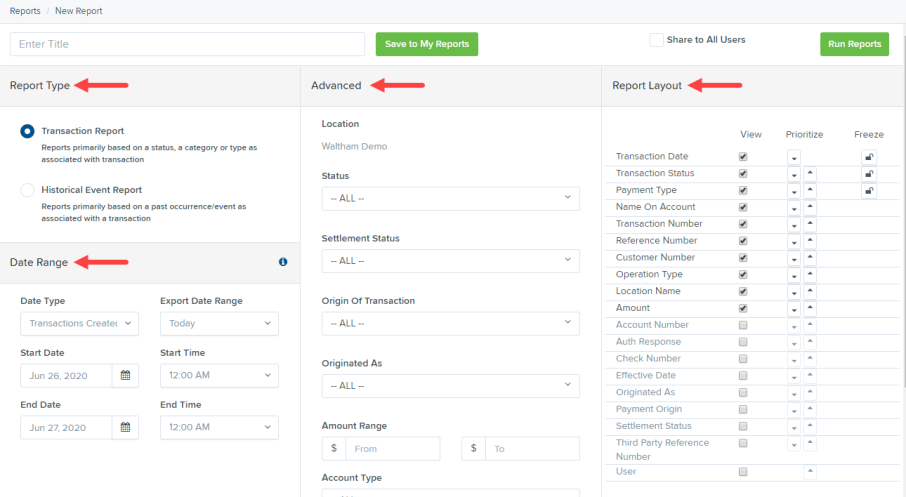
- Report Type:
- Transaction Report – is based upon the current status of a transaction
- Historical Event Report – is based upon past events a transaction has been through in the system
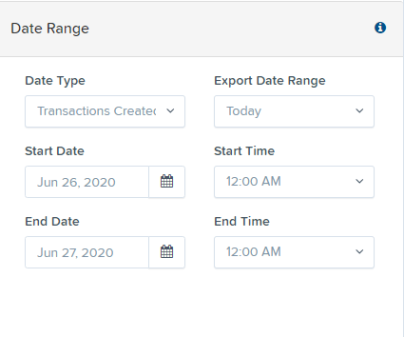
- Date Range
- Date Type - select either Transactions Created or Effective Dates for the report, which will determine if the report displays transactions based upon the date they were created versus the date they took effect.
- Select a pre-specified date range using the Export Date Range option (ideal for recurring reports)
- Or specify your own date range with the Start Date and Start Time and the End Date and End Time fields. NOTE: If you are creating a Historical Event Report, a custom date range will be unavailable.
- Advanced Filters section – Specify the Location and Status of the transaction you wish to have in your report.
| Field Name | Description |
|---|---|
| Settlement Status | Whether a transaction has been deposited. Designate a single status or multiple statuses by selecting the appropriate check box (es). |
| Origin of Transaction | Determines how the transaction was received and will be coded. You may designate a single origin for the report or multiple origins by selecting the check box next to each option. |
| Originated As | Specifies how the transaction will be processed. You may designate a single type or multiple types. |
| Account Type | Determines the type of transaction the report will display. You can select a specific account type or select ALL. |
| Operation | This option specifies what process a transaction has been through. You may designate one process or select ALL. |
| Authority Response Code | This option represents the types of return responses that can be received for a transaction. Select a specific response code or select ALL. |
| Amount Range | The From and To options allow you to look for transactions with a specific amount or between amount values in decimal format (XX.XX). |
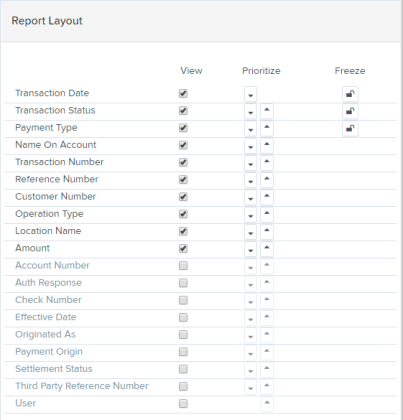
- Report Layout – This section allows you to organize how the report displays.
- Select the View check box next to any fields to have them show on the report.
- Under Prioritize, use the arrows to change the order in which information appears. For example, select the upward arrow to have a field listed before others, or the select the downward arrow to have other fields listed before it.
- Use Freeze to lock fields when viewing a report. This will hold certain fields in view while you explore the rest of the report information.
4. At this time, you may choose to select the Share to All Users check box (as shown below) if you want to have this report available for other users to view. If you selected New Shared Report previously, this box will already be selected.
Alternatively, you may wish to save the report for your own use at a later time by selecting Save to My Reports. This option will both save the report and generate a report to view.
Click Run Reports.

5.The report is presented on the screen.
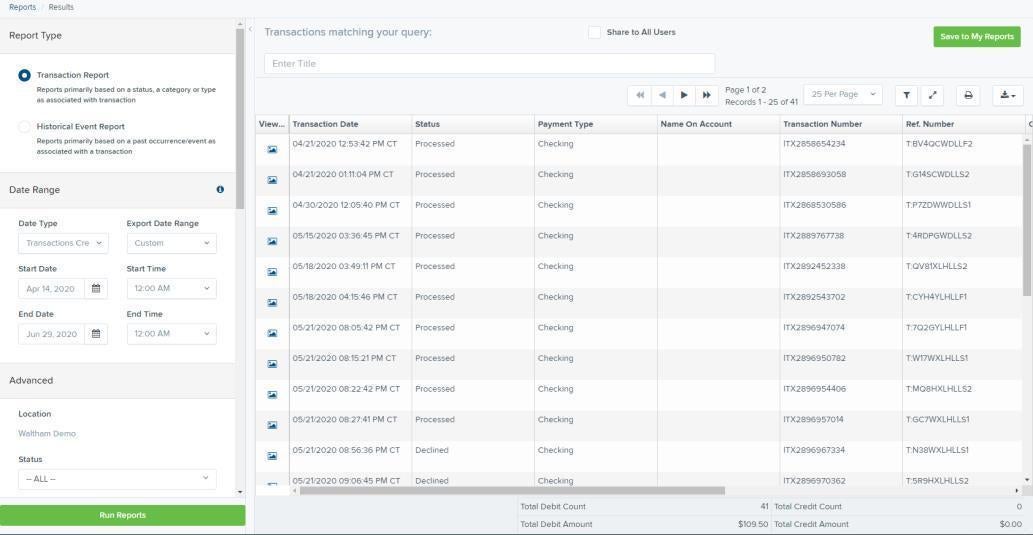
- Use the filters to change the report and then select Run Reports again.
- Select
Filter to display searchable fields that will filter report information based on the criteria entered.
- Use
View mode to expand the reporting results to a full page. Use the same button to revert to the normal view.
- Use
Print to produce paper copies of reports. Printing in landscape mode allows you to print more data columns per page than portrait mode.
- The
Export menu has options for exporting report results in several formats.
- Column headers in the report are selectable by organization. Select a column header to organize the report based on that column’s information, in either ascending order (designated by an upward arrow) or descending order (designated by a downward arrow).
- Select View to the left of an item to view more details about the transaction.
- To change the report template, adjust the report filters as desired, and then select Save to My Reports, which will save the filter options as a template for later use.
NOTE: Be sure to select the Share to All Users check box if you wish to save the report for others to use.
DEPOSIT RESULTS REPORT
The Deposit Results report allow you to review a deposit status, event history, and images of all batches and items scanned.
To generate the report:
-
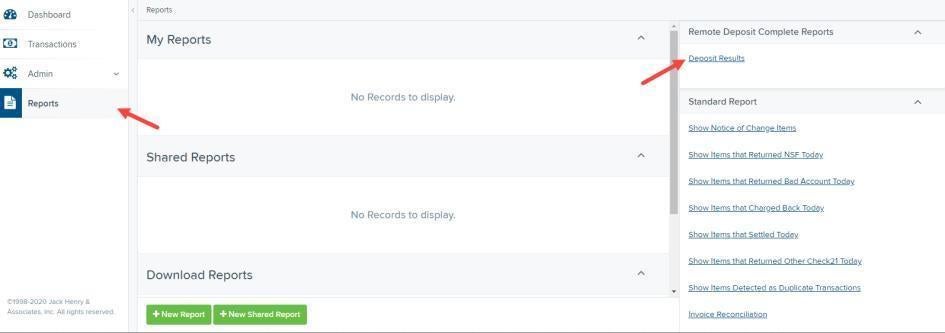
Click Reports on the left side of the page. On the right side of the page under Remote Deposit Complete Reports, select Deposit Results.
-
Select the location for which the deposit was created, and then choose the date range. The start date should be the date the batch was created. Click Get Deposits.
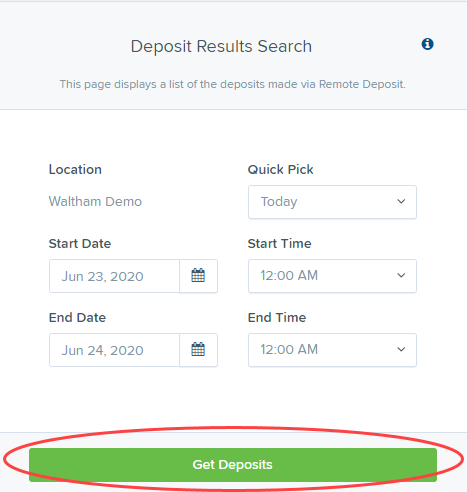
-
A list of the batches matching your criteria appears. You may need to scroll to the right to view all of the information for the report. Use the filters to change the report and then select Get Deposits again, or you can print/export the report, as needed.

Deposit Results Report Field Descriptions
Below are descriptions of the fields on the Deposit Results Report
Field Name Description Item Details Click
Deposit Details Click
Create Date The date the batch was created. Location The account into which the deposit is being sent. Batch Type The function used to create the deposit. Description Time and date stamp. Deposit Account The account number for the account into which the deposit is being sent. A deposit with multiple items that uses more than one deposit account will appear as Multiple. Deposit Status Current status of the batch Your Count Control count entered by the user when the batch was opened. Received Count Control amount entered by the user when the batch was opened. Received Amount Amount of deposit received by the system. ACH Deposit Date Not Applicable ACH Deposit Count Not Applicable CS21 Deposit Date Date Check 21 (C21) items will be deposited. CS21 Deposit Count The number of items that will deposit as Check 21 (C21) CS21 Deposit Amount The total amount of items that will deposit as Check 21 (C21). Total Deposit Count The total count of items that will be deposited as Check 21 (C21). Total Deposit Amount The total amount of Check 21 (C21) items that will be deposited. Deposit Status Definitions
Knowing the status of a batch is important to the batch processing. A batch can be in any of the statuses listed below.
Deposit Status Definition Approved The transaction has been verified and will be processed at the next cutoff time. Deleted The entire deposit has been deleted by someone in your organization prior to closing it. The deposit may not be deleted once it has been closed. None of the items will be sent to transaction processing. Deposited All items have been processed successfully, and the deposit is in balance with no discrepancies or errors. These items are now in the Approved status, and an email notification has been sent. Deposited with Adjustment One or more of the items within this deposit caused an adjustment to the total deposit amount. The transactions have been sent to transaction processing with the adjusted deposit amount. An email notification has been sent. Open for Scanning A deposit has been created and is open to scan. Items can be scanned into this deposit until it is closed. Partial Deposit One or more of the items was removed from the deposit due to a duplicate or rejected item. The deposit has been sent to transaction processing with the deposit total minus the items that will not be processed. An email notification has been sent. Rejected This deposit status indicates the entire deposit has been rejected. A deposit is rejected when the adjustment amount exceeds the adjustment limit assigned by the bank or when all items within the deposit are rejected possibly due to all being duplicates. Submitted This deposit status indicates the deposit has been closed and the items are being reviewed for accuracy and errors. Once finished, the status of the items will change to one of the statuses defined previously. -
Select

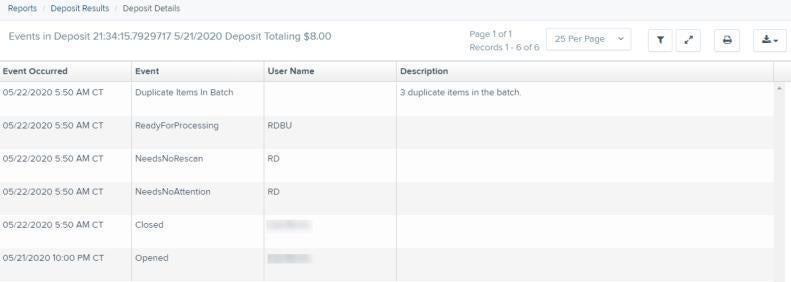
under Deposit Details to see the event history for the batch, including deposits rejected upfront. The details will display on the Deposit Details page. Navigate back to return to the report results.
Deposit Details
-
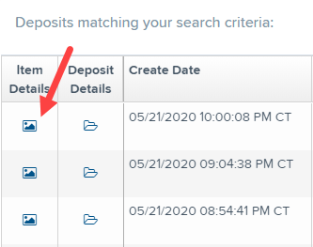
From the Deposit Results page, select

Item Details to view the individual transactions within the deposit. Results will appear on the Item Details page. Items that need to be rescanned or have been rejected will be in red.
Item Status Descriptions
Similar to the batch itself, the individual items within a batch will go through various statuses. An item can be in any of the statuses listed below.
Item Status Definition Deposited The item has gone through the keying and balancing process and will be in approved status until the next scheduled cutoff time. Error The item encountered an error and will need to be rescanned in a new batch. Duplicate The item was sent to transaction processing and rejected as a duplicate. The item will not be processed with this batch/deposit. In Review The item was flagged to ensure that the amount and MICR line are correct. The status will change once the corrections are made. Needs Rescan The item has a poor image quality or is a partial image. The batch/deposit will be re-opened so that you can rescan this item again in order for the batch/deposit to be processed. Open The item was scanned with no problems in an open deposit. Once the deposit status becomes Deposited, the item will be sent to transaction processing. Rejected The item has been rejected because it is a duplicate, has bad image quality, or cannot process through RDC (such as foreign checks.) -
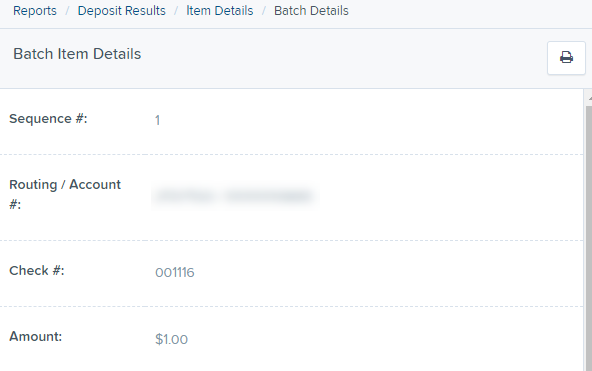
Select

View under Item Details to view the Batch Item Details page, which has information about the item in relation to the batch.

-
Select

Check Image to see specific item detail information (see figure below).

- On the Batch Item Details page, select Show Event History to see the automated steps/processes the transactions has been through.
CREDITS AND DEBITS TO YOUR MERCHANT SETTLEMENT ACCOUNT
The Credits and Debits to Your Merchant Settlement Account report is a date range report that identifies the deposits made on the indicated date(s). The report will also display the individual transaction amounts that make up a deposit and specific details of a transaction.
-
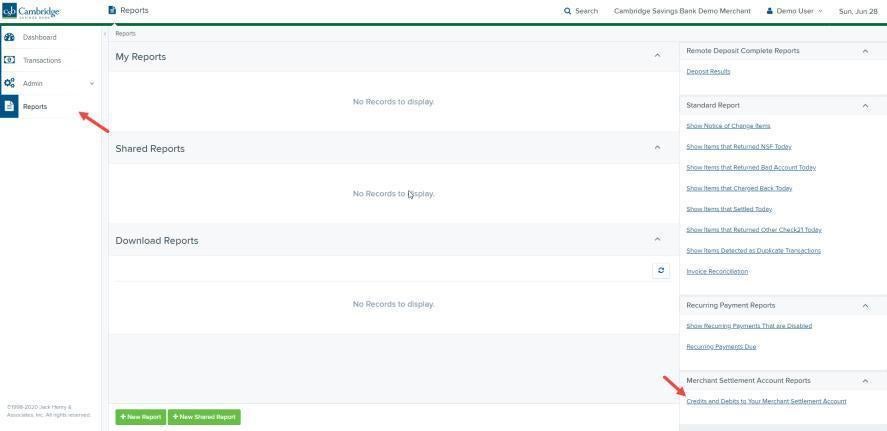
Click Reports on the left side of the page. On the right side of the page under Merchant Settlement Accounts Reports, select Credits and Debits to Your Merchant Settlement Account.

-
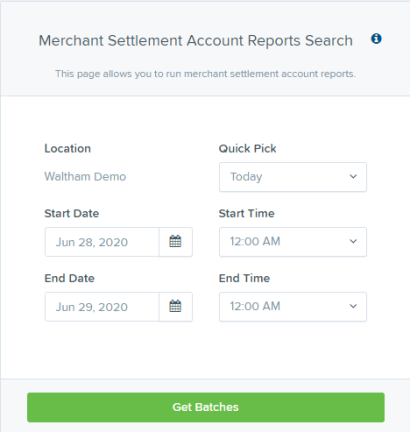
The Merchant Settlement Account Reports search criteria appears. Select a Location ID to pull report information from. Select a date range using either the Quick Pick option with a list of pre-set date ranges, or the custom option by entering a Start Date and Start Time and the End Date and End Time.
-
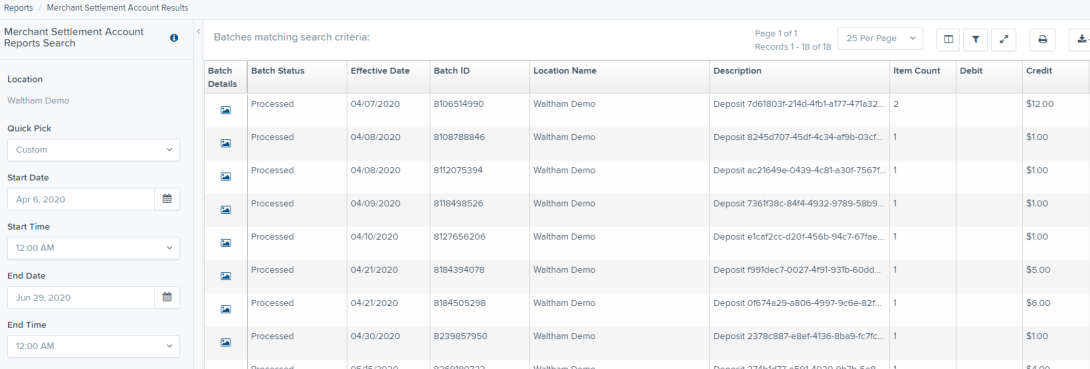
Click Get Batches. The report will appear on the screen. Use the filters to change the report and then select Get Deposits again, or you can print/export the report, as needed.
-
Select

View under the Batch Details column to view the Batch Details page.
-
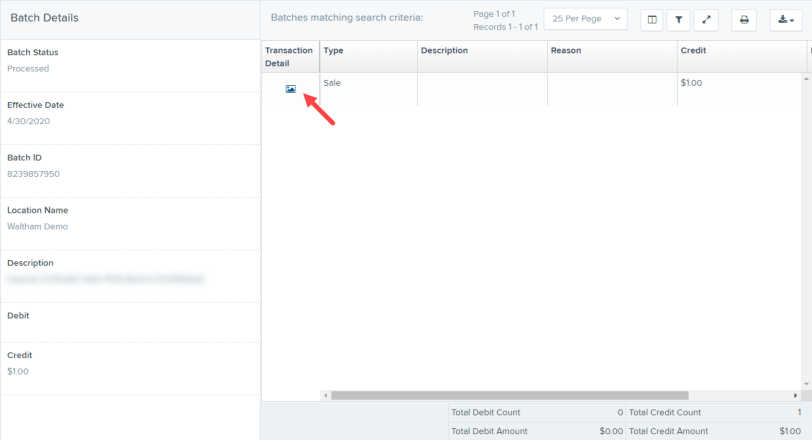
From the Batch Details page, select

View under the Transaction Details column to see more information about that particular transaction in the batch.
-
Navigate back in your browser to return to the Merchant Settlement Account Results. From here, select

Report to see a PDF report with the transaction(s) that make up the deposit total displayed below the report.
