Quick Start Guide
This Quick Start Guide will provide you with the steps on how to get started quickly.
This Quick Start Guide provides step-by-step instructions to help you complete the following actions:
-
Install Device Control (Scanner Install)
-
Initiate a Deposit
-
View a Deposit Status
Note: The Remote Deposit Capture system is defaulted to reflect Central Time (CT)
INSTALLING DEVICE CONTROL
If you are accessing the application for the first time, you will need to install Device Control, a feature used to manage your scanner. Device Control will need to be installed before you can begin making deposits.
-
Login into Business Online Banking, navigate to the Activities & Reporting tab and select Remote Deposit – New from the dropdown menu. Click the Login to Remote Deposit – New button.
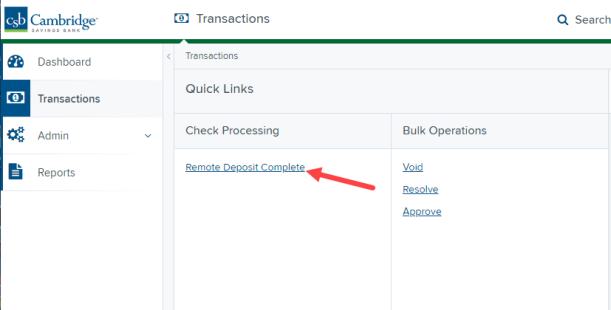
- From the Remote Deposit Dashboard, click Transactions on the left side of the page.
-
Under Check Processing, select Remote Deposit Complete.

-
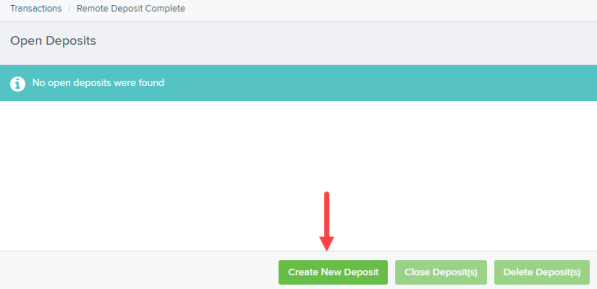
The Open Deposits page appears. Select Create New Deposit.
-
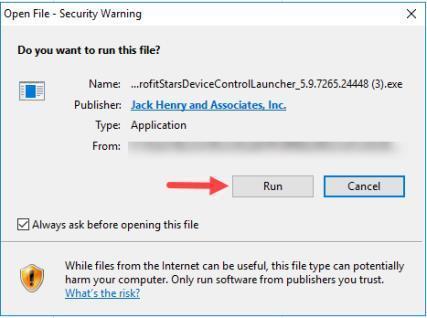
The Device Control prompt appears, informing you that Device Control is attempting to launch. Select Run to continue.
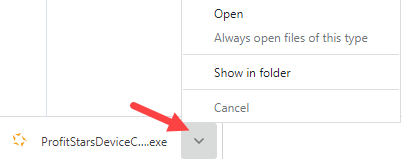
For Google Chrome users, click on the ProfitStarsDeviceCon….exe. All browser settings differ, you may need to click on

to open the file.
For Internet Explorer users, you may need to click on

to Save or Save as to open the file.


- The system will prompt you to being installing Device Control. Select Install to continue.
- A prompt may appear, confirming that a user with Administrator rights to the computer will proceed with the installation. Select OK to continue.
- Device Control with initialize. Choose the scanner and model you wish to install for use and then click Install.
- The Add/Remove Devices window appears. Select the scanner you wish to add, and then select Install.
- The Install Wizard toll appears. Disconnect the scanner you wish to install from your computer, and then exist all other applications. Select Next in the Install Wizard tool to continue.
- After the Install Wizard tool has completed, connect the scanner to your computer and then click Finish. The scanner is now installed, and you may begin scanning deposits.
INITIATING A DEPOSIT
-
From the Remote Deposit Dashboard, click Transactions on the left side of the page.
-
Under Check Processing, select Remote Deposit Complete.
-
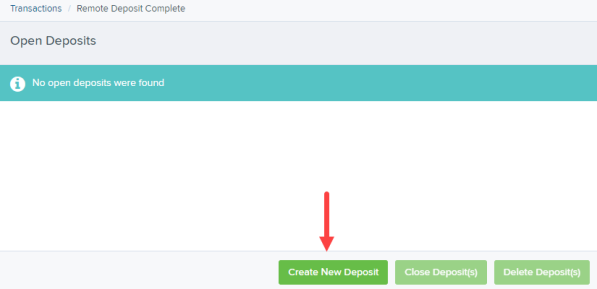
The Open Deposits page appears. Select Create New Deposit.
-
Select the Location (account) for which the batch is to be processed from the dropdown (if applicable), enter in the number of checks and total dollar amount of the deposit. Click Create.
-
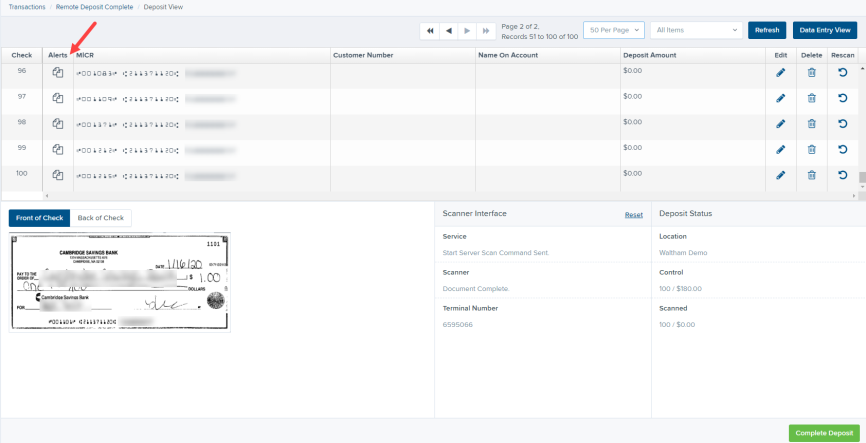
Place the check(s) in the scanner. Once you have scanned all of your checks, review any of the items that require additional attention. Keying and balancing and MICR repair will take place once this has been closed and submitted for processing.
Alerts - An icon will presented in the Alerts column if the item has a duplicate MICR, requires a rescan or has an invalid MICR.

Duplicate MICR - If a particular check has been scanned before, it will appear as a duplicate in the item list. RDC will not submit duplicate items for processing.

Rescan – To rescan an item, select Rescan to the right of the item the needs rescanning. A window will appear allowing you to rescan an item as needed.

Invalid MICR – The MICR on the check is not formatted correctly and cannot be read by the scanner.
-
When you have finished scanning and reviewing the items, select Complete Deposit.
On the Open Deposits page, select the checkbox in the Open column next to the deposit you wish to close.
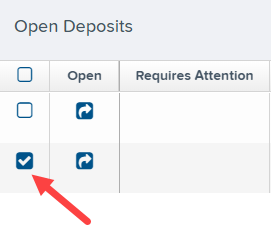
Select Close Deposit(s) from the bottom of the page.

-
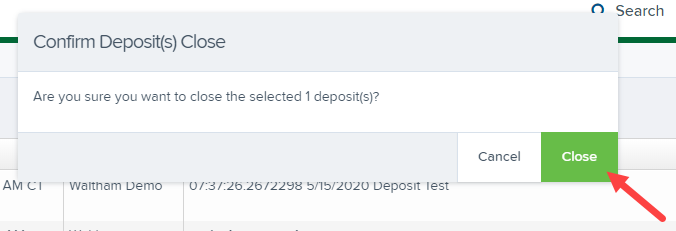
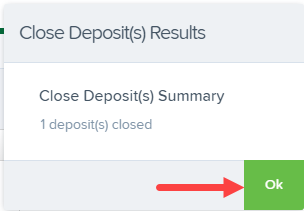
Select Close on the Confirm Deposit(s) Close confirmation screen. The system will ask you to confirm closing your selected deposit(s). The deposit will be sent to CSB for processing.
VIEWING A DEPOSIT STATUS
-
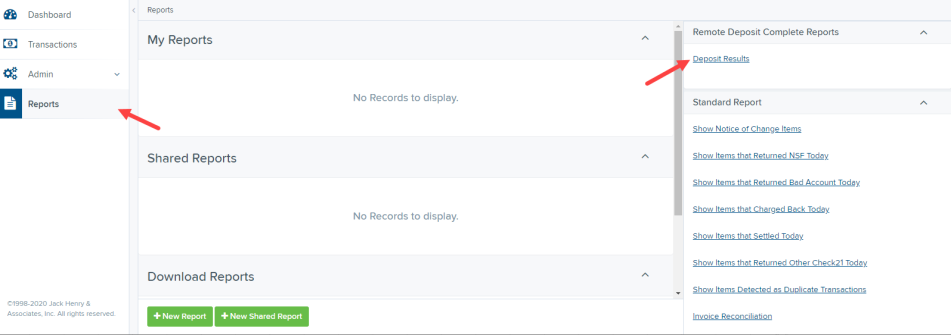
To review the status of your deposit, select the Reports from the left main menu. Select the Deposit Results link on the right.
-
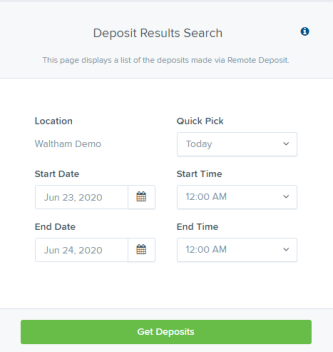
Select the location for which the deposit was created, and then choose the date range. The start date should be the date the batch was created.
-
Click

under Item Details to view individual items in the deposit. Click

under Deposit Details to see the event history for the batch, including deposits rejected upfront.

Deposit Status Definitions
Knowing the status of a batch is important to the batch processing. A batch can be in any of the statuses listed below.
| Deposit Status | Definition |
|---|---|
| Approved | The transaction has been verified and will be processed at the next cutoff time. |
| Deleted | The entire deposit has been deleted by someone in your organization prior to closing it. The deposit may not be deleted once it has been closed. None of the items will be sent to transaction processing. |
| Deposited | All items have been processed successfully, and the deposit is in balance with no discrepancies or errors. These items are now in the Approved status, and an email notification has been sent. |
| Deposited with Adjustment | One or more of the items within this deposit caused an adjustment to the total deposit amount. The transactions have been sent to transaction processing with the adjusted deposit amount. An email notification has been sent. |
| Open for Scanning | A deposit has been created and is open to scan. Items can be scanned into this deposit until it is closed. |
| Partial Deposit | One or more of the items was removed from the deposit due to a duplicate or rejected item. The deposit has been sent to transaction processing with the deposit total minus the items that will not be processed. An email notification has been sent. |
| Rejected | This deposit status indicates the entire deposit has been rejected. A deposit is rejected when the adjustment amount exceeds the adjustment limit assigned by the bank or when all items within the deposit are rejected possibly due to all being duplicates. |
| Submitted | This deposit status indicates the deposit has been closed and the items are being reviewed for accuracy and errors. Once finished, the status of the items will change to one of the statuses defined previously. |
Item Status Descriptions
Similar to the batch itself, the individual items within a batch will go through various statuses. An item can be in any of the statuses listed below
| Item Status | Definition |
|---|---|
| Deposited | The item has gone through the keying and balancing process and will be in approved status until the next scheduled cutoff time. |
| Error | The item encountered an error and will need to be rescanned in a new batch. |
| Duplicate | The item was sent to transaction processing and rejected as a duplicate. The item will not be processed with this batch/deposit. |
| In Review | The item was flagged to ensure that the amount and MICR line are correct. The status will change once the corrections are made. |
| Needs Rescan | The item has a poor image quality or is a partial image. The batch/deposit will be re-opened so that you can rescan this item again in order for the batch/deposit to be processed. |
| Open | The item was scanned with no problems in an open deposit. Once the deposit status becomes Deposited, the item will be sent to transaction processing. |
| Rejected | The item has been rejected because it is a duplicate, has bad image quality, or cannot process through RDC (such as foreign checks). |
